If you are an experienced Data Scientist, you might already be using
- Azure Blob Storage as a way to store your data,
- Python for scripting your AI code,
- Docker containers for saving your model and
- Azure Kubernetes Service or Container Instance for actually running your deployed model on scale.
Azure Machine Learning works with the same technologies: Microsoft promises to simplify our Data Science work by offering us a wrapper service – Azure Machine Learning Services – which re-uses Open-source and Azure resources we already know.
What’s Azure Machine Learning services
All capabilities included in Azure Machine Learning Workspace
How does Azure Machine Learning link with my existing Azure ressources
- your Datastore: here we can re-use our existing Azure Data Lake where our data is stored: e.g. Azure Blob Storage, Azure Data Lake Store, Azure SQL Database.


- your Compute: here we can easily link our existing compute ressources being it Azure Kubernetes Service, Azure Container Instance or Azure HDInsight. If we don’t have existing once, we can create them through Azure Machine Learning Service.


- your (Docker) images: here we can link with our existing Azure Container Registry. Azure Machine Learning Services will use this registry to save its build Docker images.
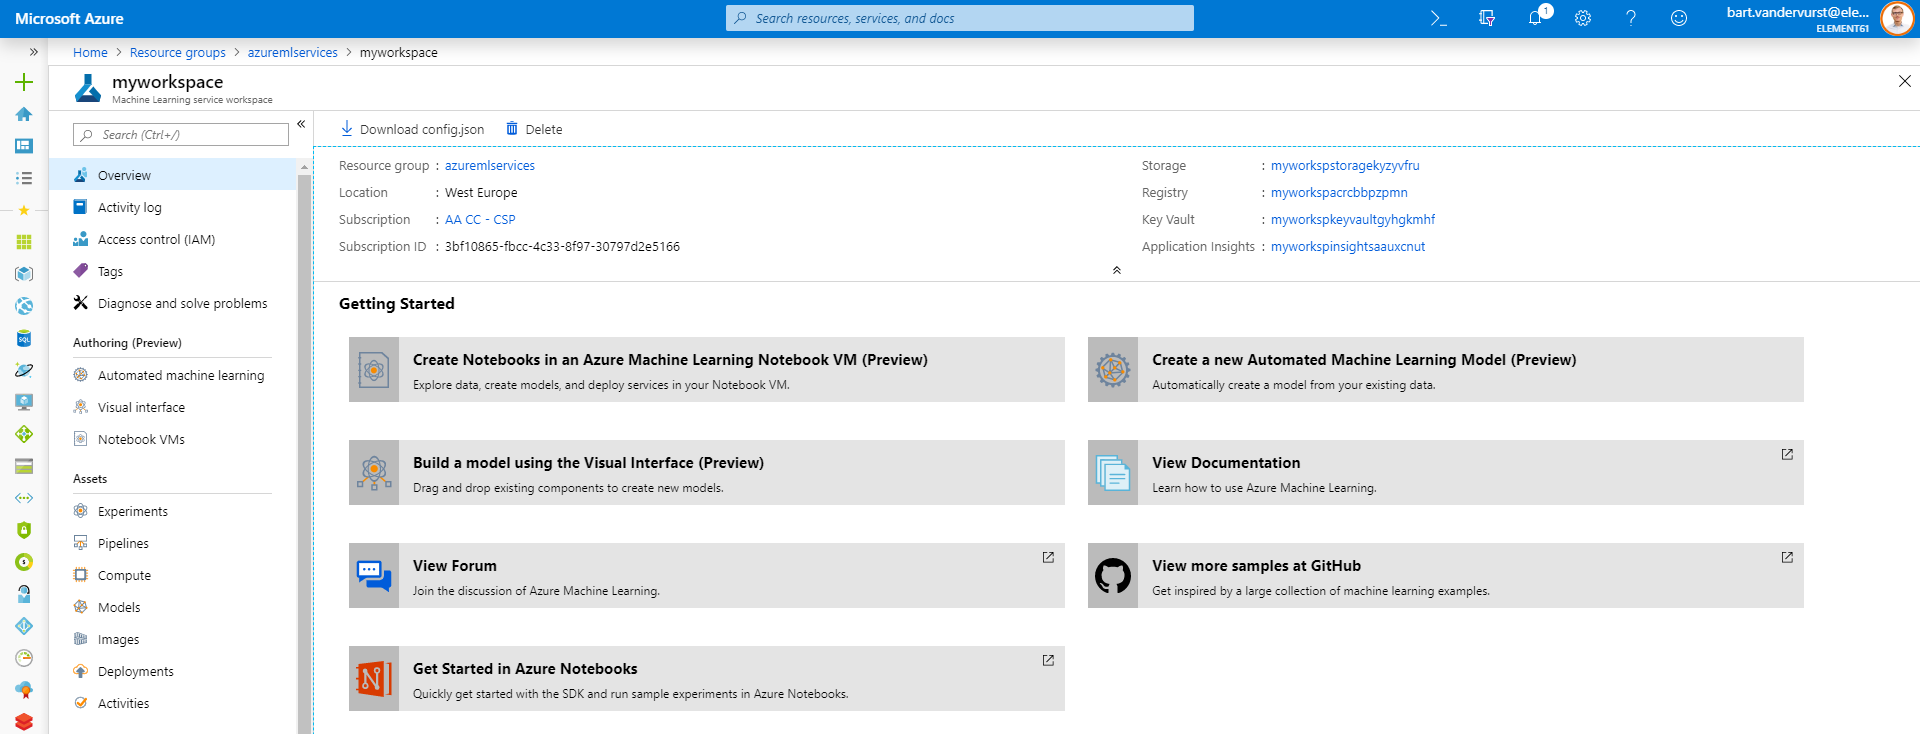
Additionally, Azure Machine Learning workspace brings some new concepts:
- Pipelines:
These are the Python script (.py) which do the data preparations, transformation, model builds and evaluations. We can build this pipeline locally in Jupyter, PyCharm or Visual Studio Code or using Azure Notebook. - Experiments:
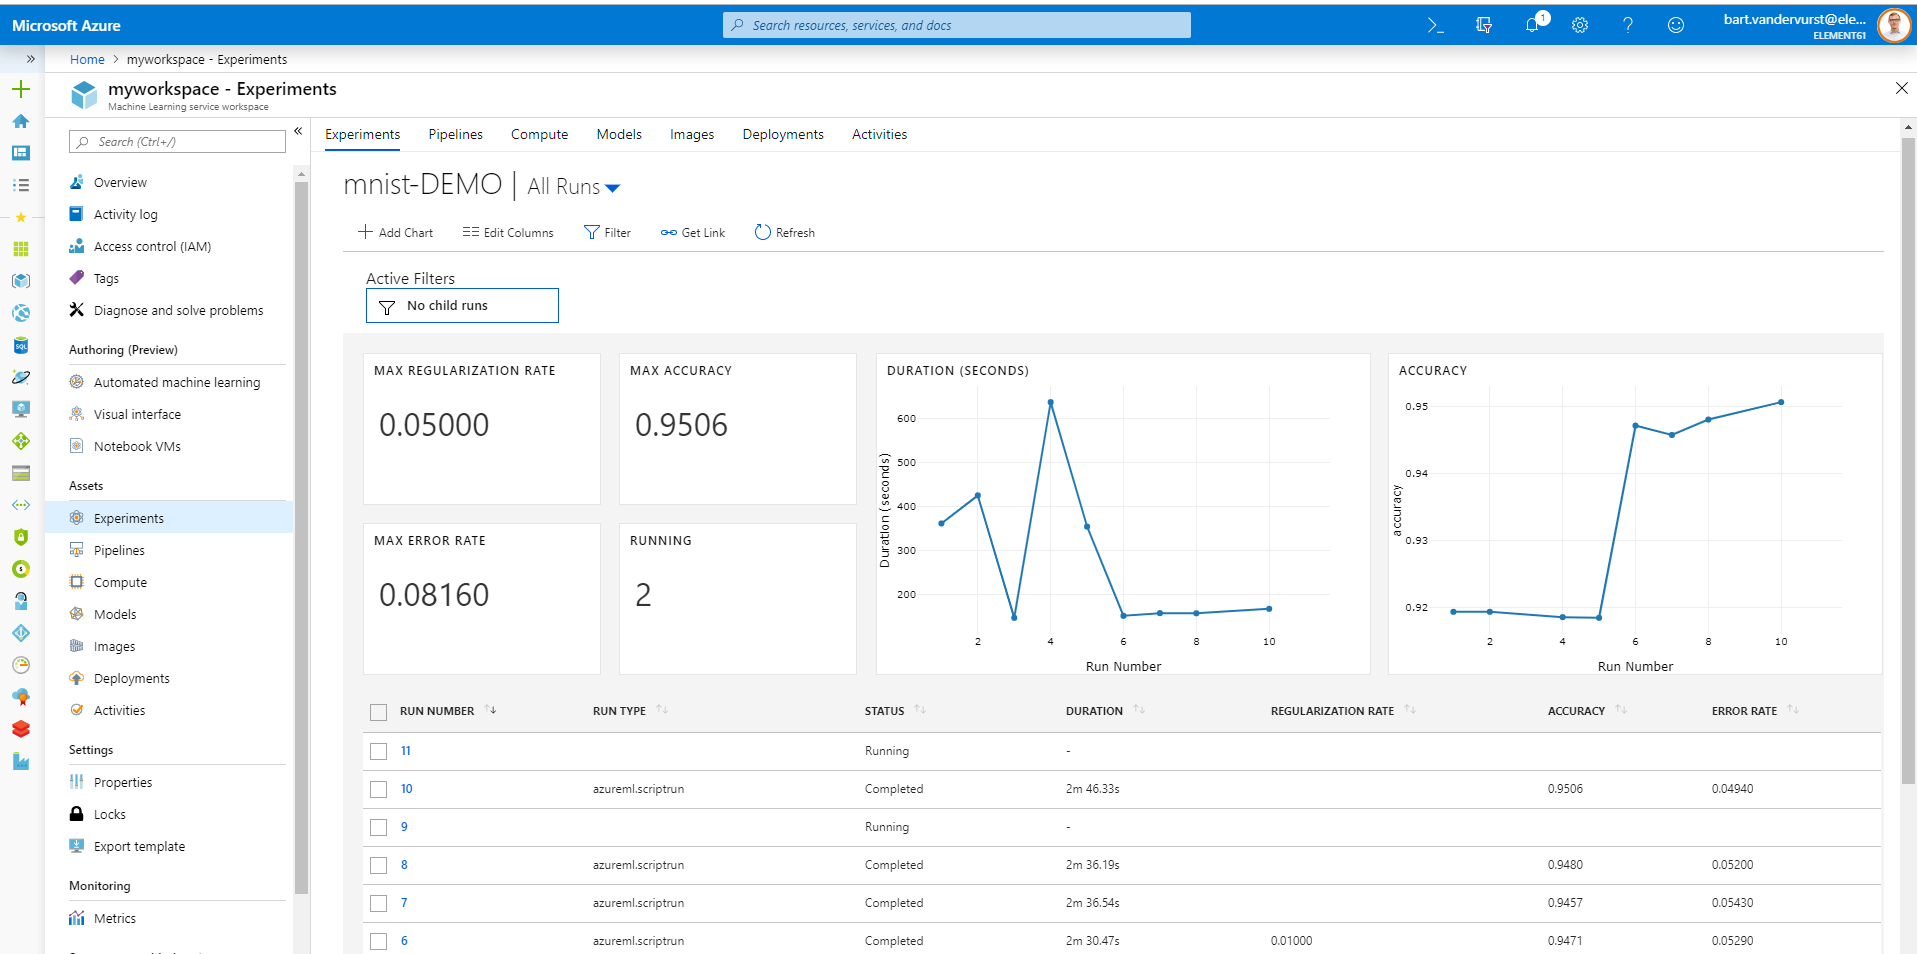
Once we run Pipelines they become experiments. This thus includes all your training runs from the pipeline code. An experiment has a dashboard with a great overview of all metrics, logs and outputs. - Models:
Here we keep track of all the models through model versioning. Every model registered gets a unique code. - Deployments:
Here we keep track of information concerning your deployments and their actual status (running, failed).
Figure 1: Azure Machine Learning Service Workspace shows on the left all our Assets
What are the strengths of Azure Machine Learning Service Workspace
- Everything can be configured and controlled with code. Microsoft understood that no single out-of-the-box tool can replace a Data Scientist’s love for open-source, including Python and Docker. Therefore, it embraced these tools and build a shell around.
- You can (re-)use your existing Azure resources: e.g. you can link your existing storage account, container registry or database with a Machine Learning Service project. Rather than a replacement, this tool allows to be an add-on to your running Azure resources simplifying your steps into building AI.
- It’s truly ‘open’: e.g. you can bring any Python packages you want including running Tensorflow (e.g. on GPUs). Microsoft made an open product embracing existing technologies like Python and Docker.
- Data Scientists get a true cockpit view on their Model building: Azure Machine Learning Service can simplify Data Scientists in building different models, running them on scalable compute targets and comparing evaluation metrics in a governed and visible way. It is one of the first tools to support a truly collaborative view on top of model building and evaluation: models are versioned, evaluation metrics visualized and logs kept
Figure 2: Experiment Cockpit view in Azure ML Service Workspace
What are current weaknesses of Azure Machine Learning Service Workspace
Although we see true benefits to embrace the functionalities of Azure Machine Learning Service for model building, we see - at time of writing this (May 2019) - some risks and pitfalls in terms of ‘fit for production’:
- Azure ML Service doesn’t guarantee proper code testing
A data scientist with access to Azure ML could easily deploy a model to production without passing proper testing of the scoring script. As such, the script might fail or be bugged - Azure ML Service doesn’t provide governance
Anyone with Contributor rights on the Azure ML workspace can deploy to production anytime. There is no ability to limit users to only have abilities to Experiment. - Development and Production is intertwined
There is a limited split between your experiment workspace and your production workspace. They reside within the same workspace and thus within the same resource group and subscription. Most organizations will prefer a governance split between development & production being using different resource groups or subscription.
Therefore, it is our recommendation not to deploy Azure Machine Learning models in the same resource group/subscription but rather to set-up an own CI/CD deployment pipeline (e.g. in Azure DevOps) for deployment in a production-dedicated resource group/subscription. Read further to read how to do this step-by-step.
How to do AI training using Azure Machine Learning Service
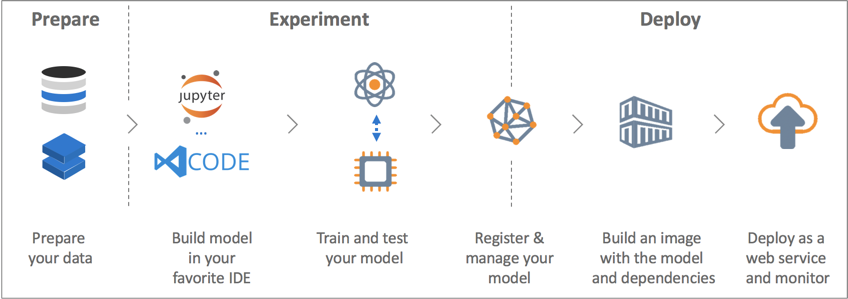
Building Machine Learning algorithms is a step-by-step process. Similarly, Machine Learning Service uses a workflow of training, experiments, scoring and deployment. Let’s us guide you through in how we recommend to use it.
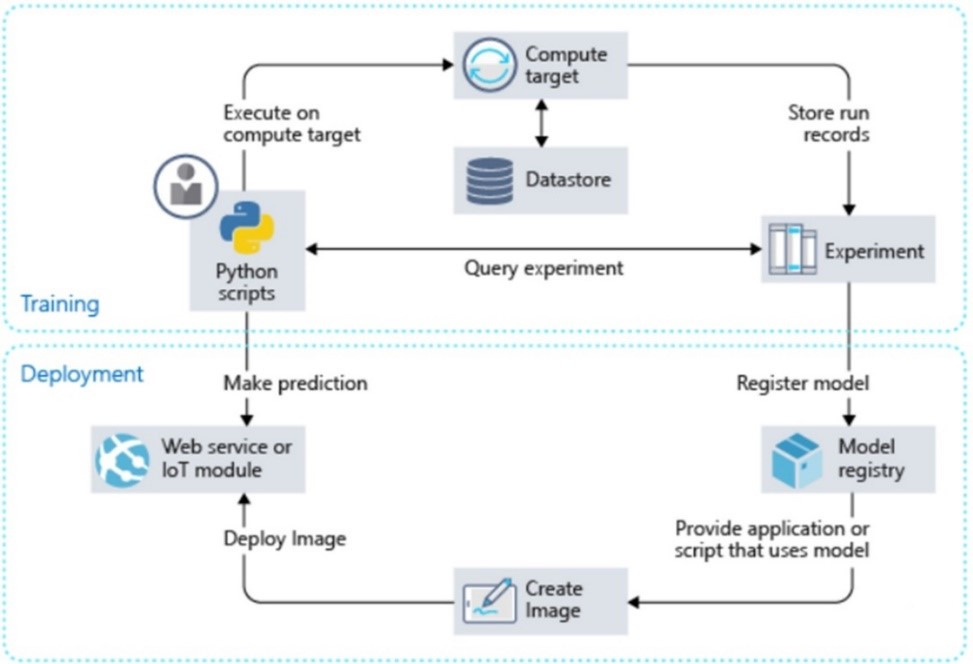
Figure 3: Azure ML's recommnended workflow
- First, activate Azure Machine Learning Service workspace. The ressource is can be activated using Azure CLI or the Azure Portal. We recommend to spin up a new workspace for every new Data Science project
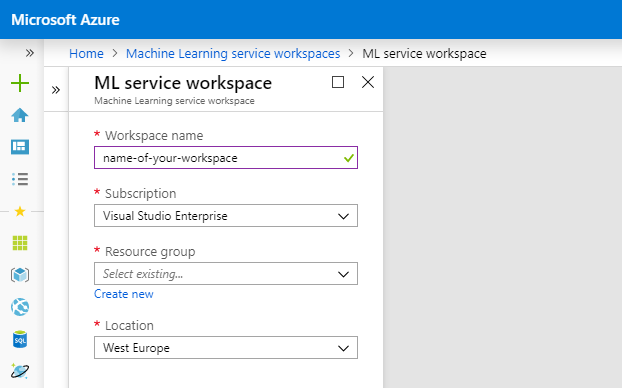
Figure: Creating a ML Service workspace in Azure Portal
- Second, open Python and connect with your ML workspace. It’s up to you to open Python either in Azure Notebooks (in the Cloud) or locally in Jupyter, Visual Studio Code or Pycharm. We would recommend running Python locally and working through a Jupyter Notebook.

To connect to your workspace, we recommend to first create a Virtual Environment. We like pipenv so
$ pip install pipenv
$ cd my-project
$ pipenv --python 3.7 #Create virtual environment
Then install the dedicated package azureml-sdk
$ pip install azureml-sdk
Once installed you can link with your workspace
from azureml.core import Workspace
ws = Workspace.create(name='myworkspace',
subscription_id='<azure-subscription-id>',
resource_group='myresourcegroup',
create_resource_group=True,
location='westeurope'
)
- Create or attach a compute resource
Up to you to select your Azure compute resource being an existing Azure HDInsight, Azure Batch, an Azure Data Science VM or Azure Machine Learning Compute, a managed compute service offering a cluster set-up of Azure virtual machines (incl. GPU support). The full list of available compute resources can be found in Azure Machine learning: configure and submit training jobs.
Let’s create a default Azure Machine Learning Compute. We’ll need to specify two parameters:
- vm_size: The VM family of the nodes created by Azure Machine Learning Compute
- max_nodes: The max number of nodes to autoscale up to when you run a job on Azure Machine Learning Compute.
from azureml.core.compute importAmlComputefromazureml.core.computeimportComputeTargetimportos
# choose a name for your cluster
compute_name = "cpucluster"
compute_min_nodes = 0
compute_max_nodes = 2
# Select your VM size -
vm_size = "STANDARD_D2_V2"
# Create if not existant
if compute_name in ws.compute_targets:
compute_target = ws.compute_targets[compute_name]
if compute_target and type(compute_target) is AmlCompute:
print('found compute target. just use it. ' + compute_name)
else:
    print('creating a new compute target...')
    provisioning_config = AmlCompute.provisioning_configuration(
vm_size = vm_size,
min_nodes = compute_min_nodes,
max_nodes = compute_max_nodes
)
# create the cluster
compute_target = ComputeTarget.create(ws,
compute_name,
provisioning_config
)
# if no min node count is provided it will scale
compute_target.wait_for_completion(show_output=True,
min_node_count=None,
timeout_in_minutes=20
)
-
Attach your data store
You need data to train a model. To access your data, you can – similar to compute - either attach your existing storage account – e.g. Blob Storage account – or create a new storage account through the Python SDK (i.e., azureml.core).
We recommend to set-up your Storage account always standalone from ML Service. Typically this would be a Data Lake as part of a bigger Modern Data Platform.
from azureml.core import Workspace, Datastore
ds = Datastore.register_azure_blob_container(
workspace=ws,
datastore_name='your datastore name',
container_name='your azure blob container name',
account_name='your storage account name',
account_key='your storage account key',
create_if_not_exists=True
)
-
Write your AI Script
With compute and data available we can construct our script. We recommend to take the following best-practice in care when building your script:
- Data should be passed on through environment variables so we can download the data as part of our script. This makes your code more generic to run also outside of Azure ML Service. Random example:
$ python run_train –-data-in wasb://container@account.blob.core.windows.net/folder
- Write all objects you want to save (e.g., the model) as part of the Python Script
Imagine we want to run a Churn Prediction and we have our data in csv’s in our Blob Storage account. An example script (train.py) might be
import argparse
import os
import pandas as pd
import numpy as np
from sklearn.externals import joblib
from sklearn.ensemble import RandomForestClassifier
from sklearn.metrics import roc_auc_score
from azureml.core import Run
# Your script receives the data-folder-location as an argument
parser = argparse.ArgumentParser()
parser.add_argument('--data-folder', type=str, dest='data_folder',
help='data folder mounting point')
args = parser.parse_args()
data_folder = args.data_folder
print('Data folder:', data_folder)
# Load Train and Test datatrain_data = pd.read_csv(os.path.join(data_folder, 'train.csv’), False) test_data = pd.read_csv(os.path.join(data_folder, 'test.csv’), False)print(train_data.shape, test_data.shape, sep = '\n')
# Train a Random Forest
clf = RandomForestClassifier()
clf.fit(train_data[‘y’], train_data.drop('y', axis=1))
# Test a Random Forest
y_pred = clf.predict(test_data.drop('y', axis=1)))
# Calculate accuracy on the prediction
auc = roc_auc_score(test_data[‘y’], y_pred)
print('Your AUC is ', auc)
# Now let’s log the results back to our ML Workspace
# First, we fetch the context of this run
run = Run.get_context()
# Next we log with the run.log() statement
run.log(‘auc’, np.float(auc))
run.log('error rate', np.float(1-acc))
# Finally, let’s save our outputs
os.makedirs('outputs', exist_ok=True)
# Files saved in the outputs folder are automatically uploaded in ML
joblib.dump(value=clf, filename='outputs/sklearn_model.pkl')
- Run our AI Script as experiment
Up to now we have prepared but not actually ran something. An actual run of the model is called an Experiment within Azure ML Service. As mentioned above, we can monitor all runs or experiments within our ML workspace including the logs, output and scripts.
# Let’s create an experiment
experiment_name = 'churn-attempt-one'
from azureml.core import Experiment
exp = Experiment(workspace=ws, name=experiment_name)
To actually trigger an Experiment we need to create an Estimator. An Estimator is a reference linking the script with the compute and storage. Note some specifics in below code:
- To access data during our Experiment we’ll pass the location of the data as an argument to the Python script. The ‘as_mount’-function helps us mount our storage account to our compute target.
- In ‘conda_packages’ we specify all needed packages needed to run train.py
- We reference to a source directory. In this example our code is locally so we reference to our current work directory
importosimportazureml.datafromazureml.data.data_referenceimportDataReferencefromazureml.train.estimatorimportEstimator
script_params = {
'--data-folder': ds.path('input').as_mount()
}
est = Estimator(source_directory= os.getcwd(),
script_params=script_params,
compute_target=compute_target,
entry_script='train.py',
                conda_packages=['scikit-learn', 'pandas'])

Run the experiment by submitting the estimator object. And you can navigate to Azure
portal to monitor the run.
# Trigger the Experiment
run = exp.submit(config=est)
The first run can take quite long (approximately 10 minutes). For subsequent runs, as long as the dependencies (conda_packages parameter in the above estimator constructor) don't change, the same image is reused and hence the container start up time is much faster.
Here is what's happening while you wait:
- Image creation: A Docker image is created matching the Python environment specified by the estimator. The image is built and stored in the ACR (Azure Container Registry) associated with your workspace. Image creation and uploading takes about 5 minutes.
This stage happens once for each Python environment since the container is cached for subsequent runs. During image creation, logs are streamed to the run history. You can monitor the image creation progress using these logs - Scaling: If the remote cluster requires more nodes to execute the run than currently available, additional nodes are added automatically. Scaling typically takes about 5 minutes.
- Running: In this stage, the necessary scripts and files are sent to the compute target, then data stores are mounted/copied, then the entry_script is run. While the job is running, stdout and the files in the ./logs directory are streamed to the run history. You can monitor the run's progress using these logs.
- Post-Processing: The ./outputs directory of the run is copied over to the run history in your workspace so you can access these results.
You can check the progress of a running job in multiple ways including the portal or using
run.wait_for_completion(show_output=False)
- Register your model
Imagine your model outcome is great. Next, you want to deploy your model. To do this you’ll need to register your model first
# Register model in ML Service workspace
model = run.register_model(model_name='mnist_model_demo',
model_path='outputs/sklearn_mnist_model.pkl')
print(model.name, model.id, model.version, sep='\t')
- Finally, deploy your model
Next, We typically see our customers deploy either their models as a scheduled job (e.g. running every day) or API/webservice. For development purposes we can perfectly deploy an Azure ML model within the same resource (i.e. using the deployment documented). However, as mentioned, we recommend to deploy Azure ML models into a separate dedicated resource group/subscription through a CI/CD pipeline. As such, you guarantee monitoring, prevent accidental overwrites and guarantee a stable production solution;
How to deploy an AI model trained in Azure Machine Learning Service
To have a solid way to go to production we recommend to use your DevOps tooling to deploy your model into a seperate production environment (i.e. seperate Azure resource group or subscription).
To do this, you'll need to set-up your DevOps tooling - e.g. Azure DevOps - with below set-up:
- It should be linked to your code versioning where all code from previous steps would be versioned on a branch ‘development’
- Once ready for production you would push this branch to master
- In your DevOps tool, your CI/CD Pipeline would be triggered by a change on the master branch and re-run above training now in your Azure ML Service for production. This would guarantee it’s using production data and the final model to be used for production is available.
- Once your model is stored, your Azure DevOps Pipeline would trigger a run of below deployment steps including
- Creation of a workspace in production (see Python code above in this insight - similarly possible through Azure CLI)
- Training of the production model (see Python code above)
- Evaluation of the production model through accuracy metrics (see Python code above)
- Registration of the model (see Python code above)
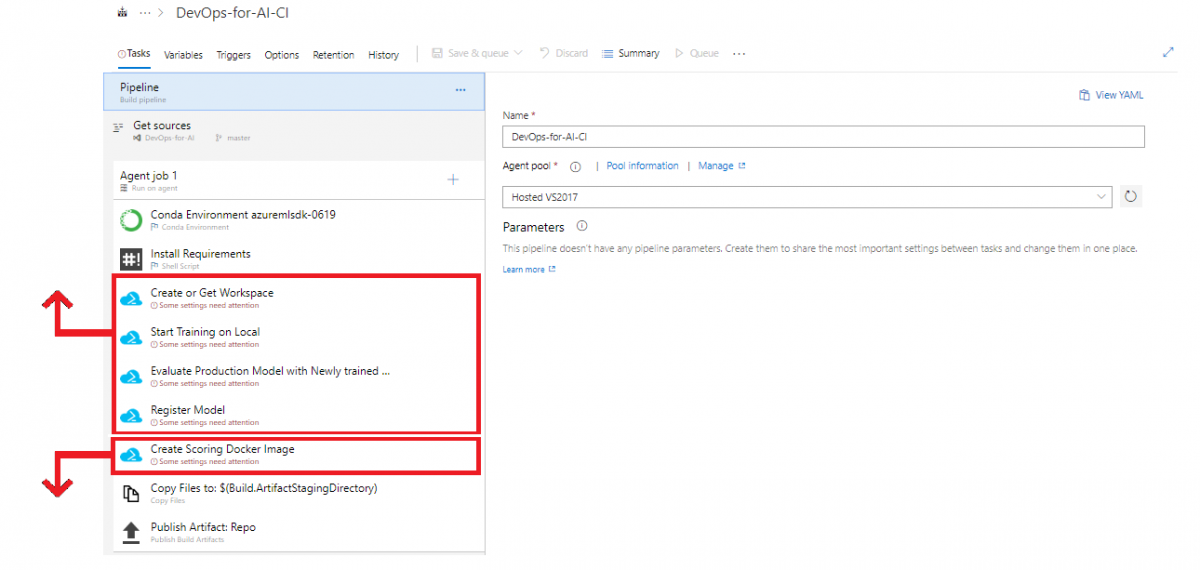
Setting up CI/CD for your Azure Machine Learning Service using Azure DevOps
- Finally, the Azure DevOps Pipeline would deploy Scoring set-up in your production environment by building a Scoring Docker image (see Python code below) based on 3 input files:
- A scoring Python script containing the the actual model scoring (see below)
- An environment file (yaml) to show what packages need to be installed (see below)
- A configuration file to build the ACI or Azure Kubernetes Service (see below)
In this insight, the Azure Labs team documented well how to set-up the Azure DevOps Pipelines using Azure CLI. In this insight we will complement their recommendations by specifying how to succesfully build a Scoring Docker Image. Let's go through the required components needed
- Create a scoring script
The scoring script is similar to the training script a Python Script. It must include two required functions into the scoring script:
- The
init()function, which typically loads the model into a global object. This function is run only once when the Docker container is started. - The
run(input_data)function uses the model to predict a value based on the input data. Inputs and outputs to the run typically use JSON for serialization and de-serialization, but other formats are supported.
import json
import numpy as np
import os
import pickle
from sklearn.externals import joblib
import sklearn
from azureml.core.model import Model
def init():
global model
# retrieve the path to the model file using the model name
model_path = Model.get_model_path('model_demo')
model = joblib.load(model_path)
def run(new_data_as_json):
data = np.array(json.loads(new_data_as_json)['data'])
# make prediction
y_pred = model.predict(data)
# you can return any data type as long as it is JSON-serializable
return y_pred.tolist()
- Create an environment file
An environment file, called myenv.yml, specifies all of the script's package dependencies. This file is used to ensure that all of those dependencies are installed in the Docker image. This model needs scikit-learn and azureml-sdk.
## myenv.yml
name: project_environment
dependencies:
  - python=3.7.2
  - pip:
    - azureml-defaults
    - scikit-learn
    - numpy
    - inference-schema[numpy-support]
    - pandas
- Create a configuration file
The deployment configuration file specifies the hardware configuration for your ACI or Kubernetes. While it depends on your model, the default of 1 core and 1 gigabyte of RAM is usually sufficient for many models. If you feel you need more later, you would have to recreate the image and redeploy the service.
from azureml.core.webservice import AciWebservice
aciconfig = AciWebservice.deploy_configuration( cpu_cores=1, memory_gb=1,
tags={"data": "MNIST", "method" : "sklearn"},
description='Predict MNIST with sklearn' )
Deploy in ACI as a webservice
Using above 3 input files, the last step in your Azure DevOps pipeline will be to build the Scoring image and deploy it to either ACI or AKS. The following Python code goes through these steps:
-
Build an image using:
- The scoring file (
score.py) - The environment file (
myenv.yml) - The model file
- The scoring file (
from azureml.core.webservice import Webservice
from azureml.core.image import ContainerImage
# configure the image
image_config = ContainerImage.image_configuration(
                    execution_script="score.py", runtime="python",
                    conda_file="myenv.yml")
-
Register that image under the workspace + Send the image to the ACI container.
service = Webservice.deploy_from_model(workspace=ws,
name='demo-service-rf',
deployment_config=aciconfig,
models=[model],
image_config=image_config)
service.wait_for_deployment(show_output=True)
-
Start up a container in ACI using the image.
service=Webservice(workspace=ws, name='demo-service-rf')
To get the scoring web service's HTTP endpoint, which accepts REST client calls:
print(service.scoring_uri)
Congrats, your model is deployed as a web service!
Should we use Azure Machine Learning Service
Yes, Azure Machine Learning Service allows Data Scientists and Data Engineers to bring their known tools including Python and Docker containers. element61 considers Azure Machine Learning Services as a solid tool to collaborate as data scientists and set-up first deployments.
However ,we recommend to not use Azure ML to build and deploy more advanced AI use-cases (e.g. demand forecasting where a model is build per product). In this case, we suggest to invest in an own set-up and to explore additional technologies such as e.g. Batch. Read our demand forecasting case study to learn more.
Additionally, we definitely recommend to deploy an Azure ML model to a separate production resource group or subscription. Using CI/CD pipelines (e.g. using Azure DevOps) this will tackle current weaknesses of Azure ML Service in regards of governance and access-right management.
