What is Azure Databricks?
Azure Databricks is an Apache Spark-based analytics service that allows you to build end-to-end machine learning & real-time analytics solutions. Azure Databricks offers all of the components and capabilities of Apache Spark with a possibility to integrate it with other Microsoft Azure services.
Setting up a Spark cluster is really easy with Azure Databricks with an option to autoscale and terminate the cluster after being inactive for reduced costs. Supports Python, Scala, R and SQL and some libraries for deep learning like Tensorflow, Pytorch and Scikit-learn for building big data analytics and AI solutions.
What is Azure Data Factory?
It is a cloud-based data integration service that allows you to create data-driven workflows in the cloud for orchestrating and automating data movement and data transformations. -Microsoft ADF team
In Data Factory there are three activities that are supported such as: data movement, data transformation and control activities. Azure Data Factory announced in the beginning of 2018 that a full integration of Azure Databricks with Azure Data Factory v2 is available as part of the data transformation activities.
Architecture

How to use Azure Data Factory with Azure Databricks to train a Machine Learning (ML) algorithm?
Let’s get started.
Setting up Azure Databricks
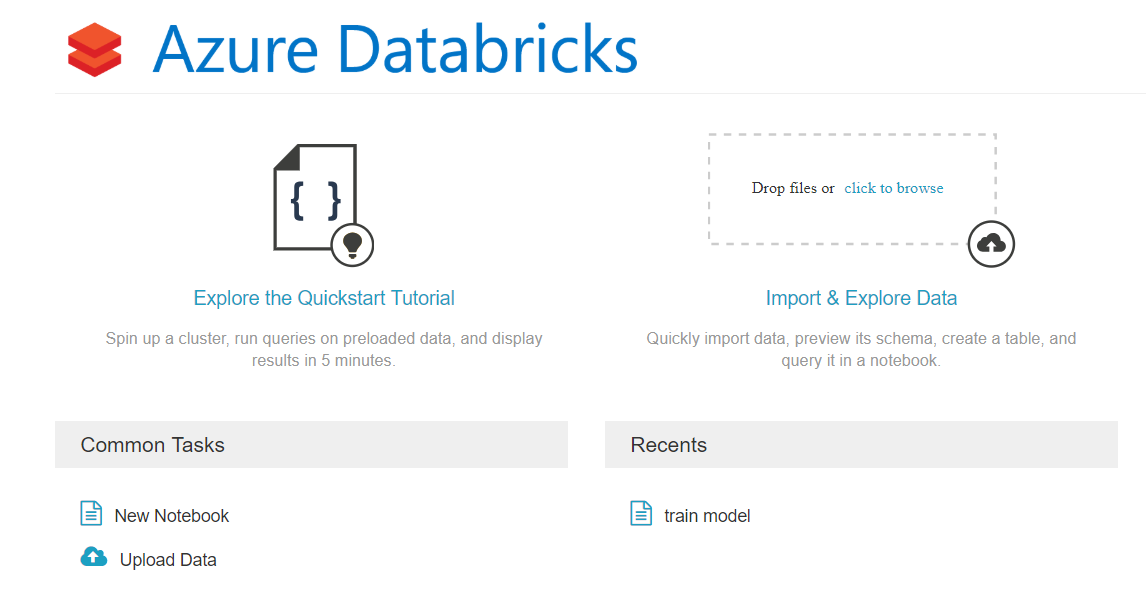
Create a Notebook or upload Notebook/ script
In this example we will be using Python and Spark for training a ML model. The code can be in a Python file which can be uploaded to Azure Databricks or it can be written in a Notebook in Azure Databricks.
Create a cluster
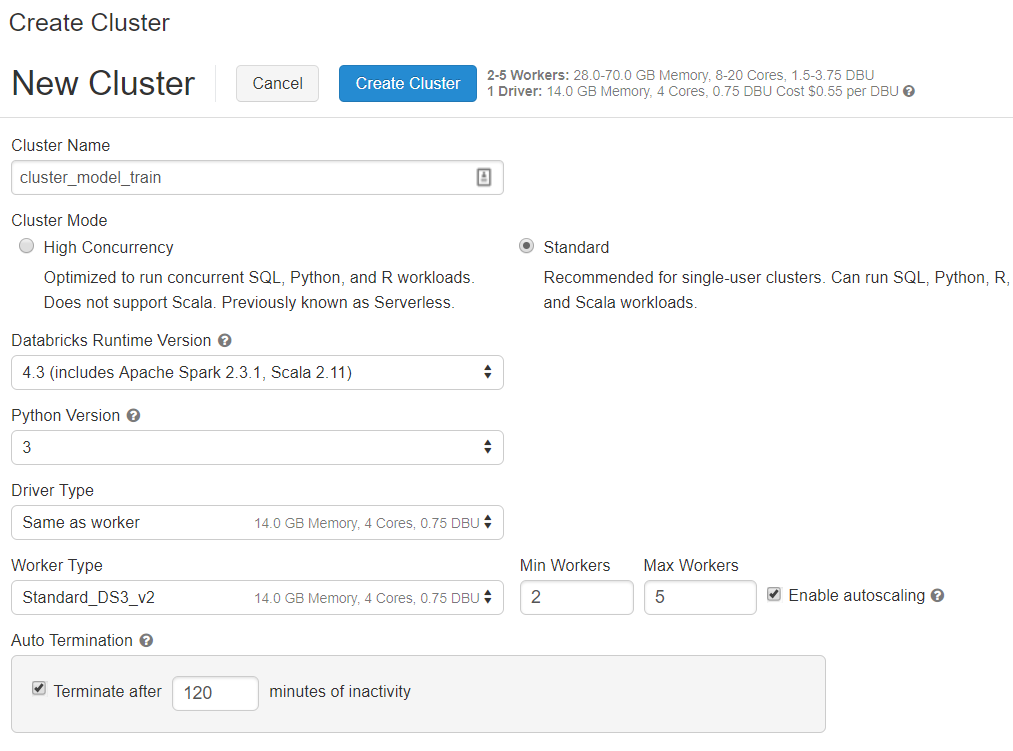
To run the Notebook in Azure Databricks, first we have to create a cluster and attach our Notebook to it. In the option “Clusters” in the Azure Databricks workspace, click “New Cluster” and in the options we can select the version of Apache Spark cluster, the Python version (2 or 3), the type of worker nodes, autoscaling, auto termination of the cluster.
Connect to data source and query data
Azure Databricks supports different types of data sources like Azure Data Lake, Blob storage, SQL database, Cosmos DB etc. The data we need for this example resides in an Azure SQL Database, so we are connecting to it through JDBC.
Now, since we have made the connection to the database, we can start querying the database and get the data we need to train the model. After getting the Spark dataframe, we can again proceed working in Python by just converting it to a Pandas dataframe. For some heavy queries we can leverage Spark and partition the data by some numeric column and run parallel queries on multiple nodes. The variables we have to include to implement the partitioning by column is marked in red in the image bellow. However, the column has to be suitable for partitioning and the number of partitions has to be carefully chosen taking into account the available memory of the worker nodes.
Python libraries
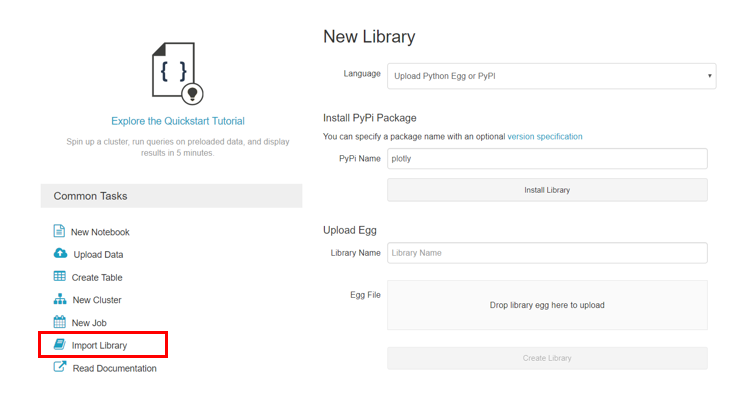
Azure Databricks has the core Python libraries already installed on the cluster, but for libraries that are not installed already Azure Databricks allows us to import them manually by just providing the name of the library e.g “plotly” library is added as in the image bellow by selecting PyPi and the PyPi library name.
Transforming the data
Next step is to perform some data transformations on the historical data on which the model will be trained. For the ETL part and later for tuning the hyperparameters for the predictive model we can use Spark in order to distribute the computations on multiple nodes for more efficient computing.
Train model
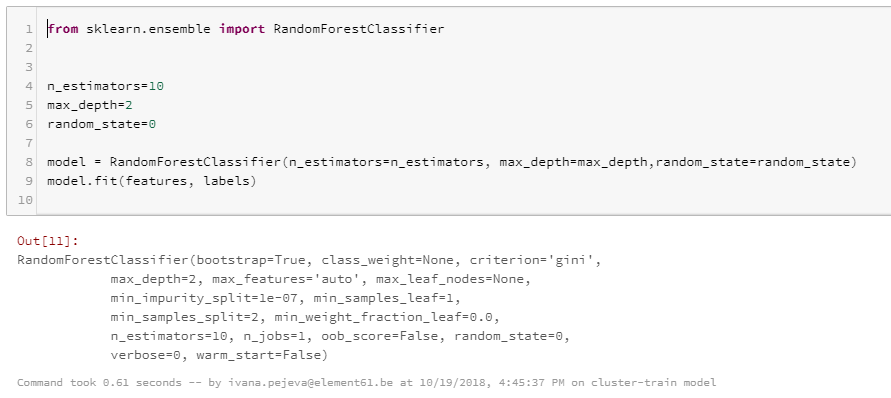
First, we want to train an initial model with one set of hyperparameters and check what kind of performance we get. Probably the set of hyperparameters will have to be tuned in case we are not satisfied with the model performance.
Tune model hyperparameters
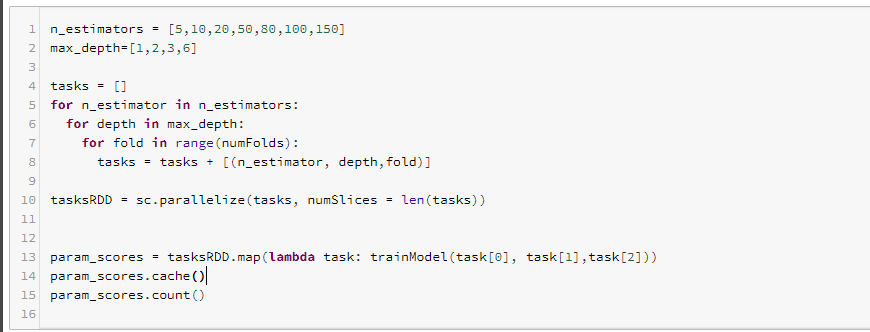
As already described in the tutorial about using scikit-learn library for training models, the hyperparameter tuning can be done with Spark leveraging the parallel processing for more efficient computing since looking for the best set of hyperparameters can be a computationally heavy process. We create a list tasks, which contains all the different set of parameters (n_estimators, max_depth, fold) and then we use each set of parameters to train X=number of tasks models. We use this list of tasks to distribute it through the worker nodes, which allows us much faster execution than using a single (master) node when using only Python. With .map we just make the transformation (known as lazy transformations in Spark), but still nothing is executed until we make an action like .count in our case.
Save model to blob storage
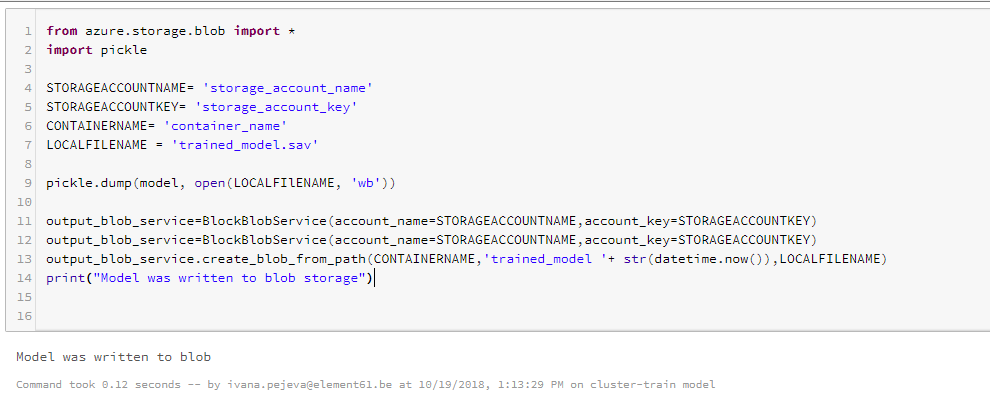
After evaluating the model and choosing the best model, next step would be to save the model either to Azure Databricks or to another data source. In our example, we will be saving our model to an Azure Blob Storage, from where we can just retrieve it for scoring newly available data.
Setting up Data Factory
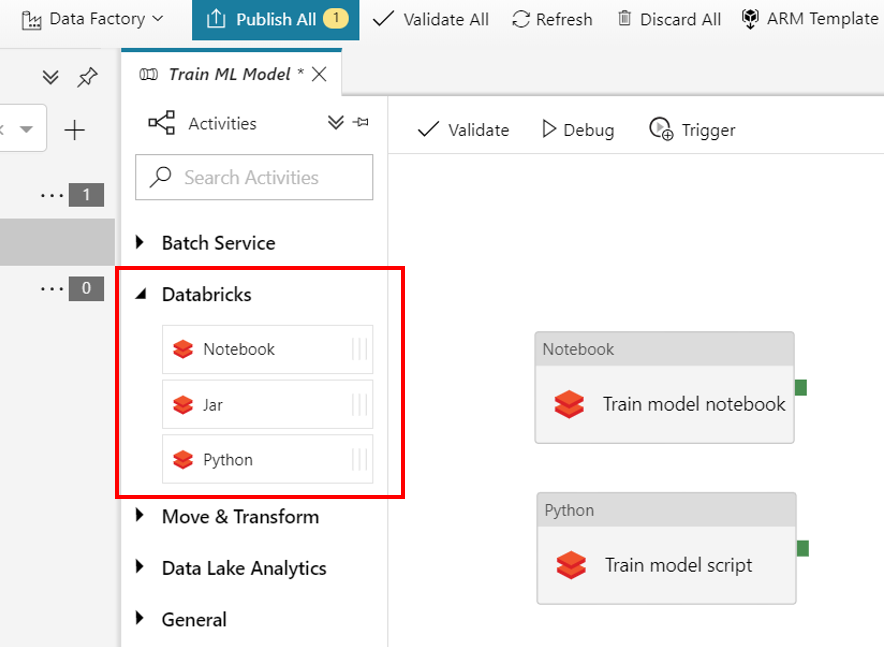
After testing the script/notebook locally and we decide that the model performance satisfies our standards, we want to put it in production. Data Factory v2 can orchestrate the scheduling of the training for us with Databricks activity in the Data Factory pipeline. This activity offers three options: a Notebook, Jar or a Python script that can be run on the Azure Databricks cluster.
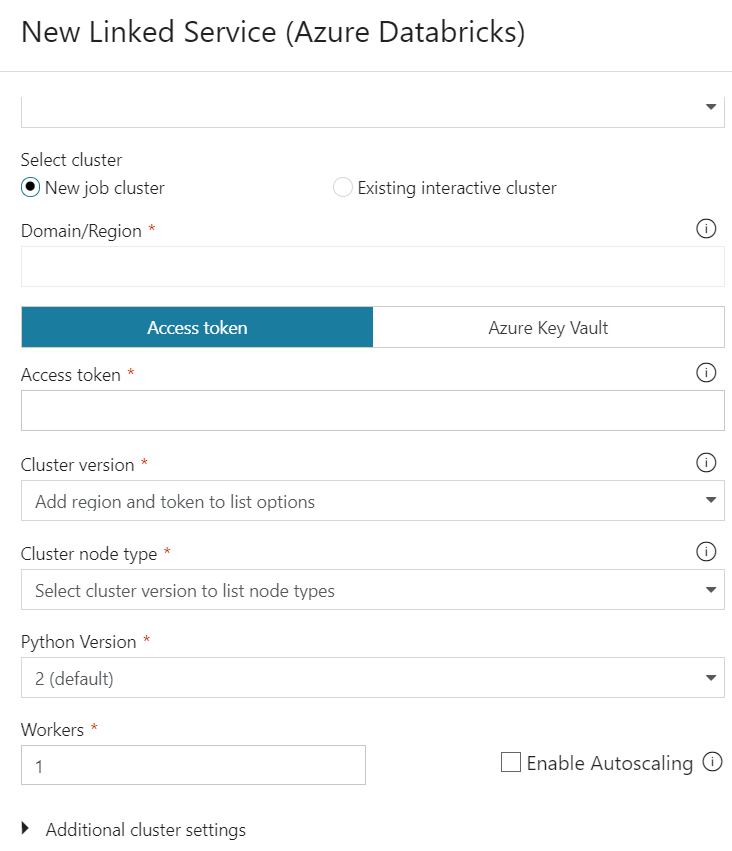
Next, we have to link the Azure Databricks as a New Linked Service where you can select the option to create a new cluster or use an existing cluster. We will select the option to create a new cluster everytime we have to run the training of the model.
The cluster is configured here with the settings such as the cluster version, cluster node type, Python version on the cluster, number of worker nodes. A great feature of Azure Databricks is that it offers autoscaling of the cluster. In the Data Factory linked service we can select the minimum and maximum nodes we want and the cluster size will be automatically adjusted in this range depending on the workload.
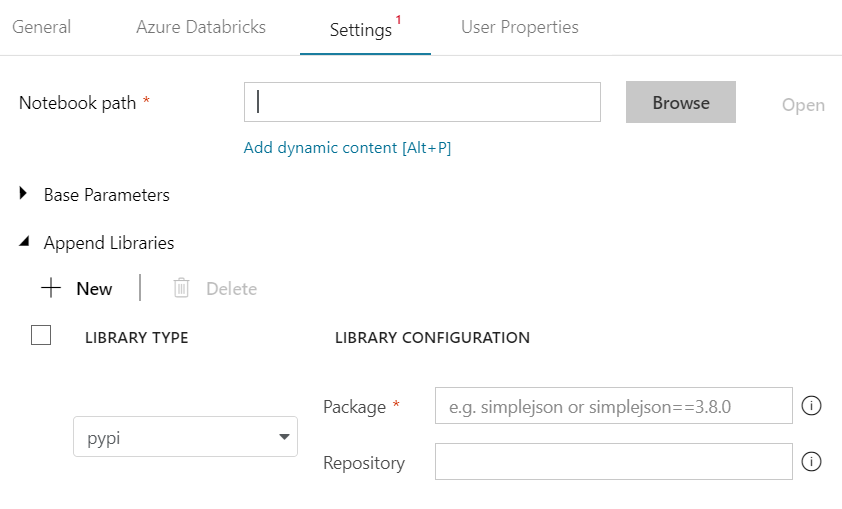
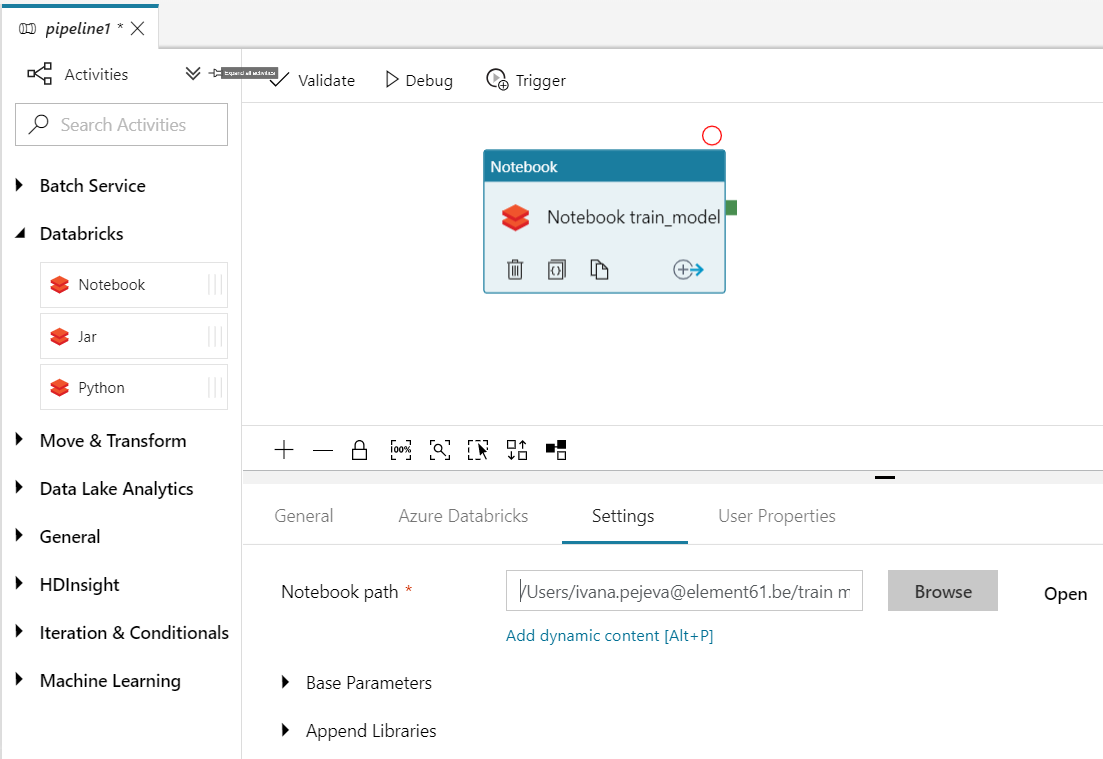
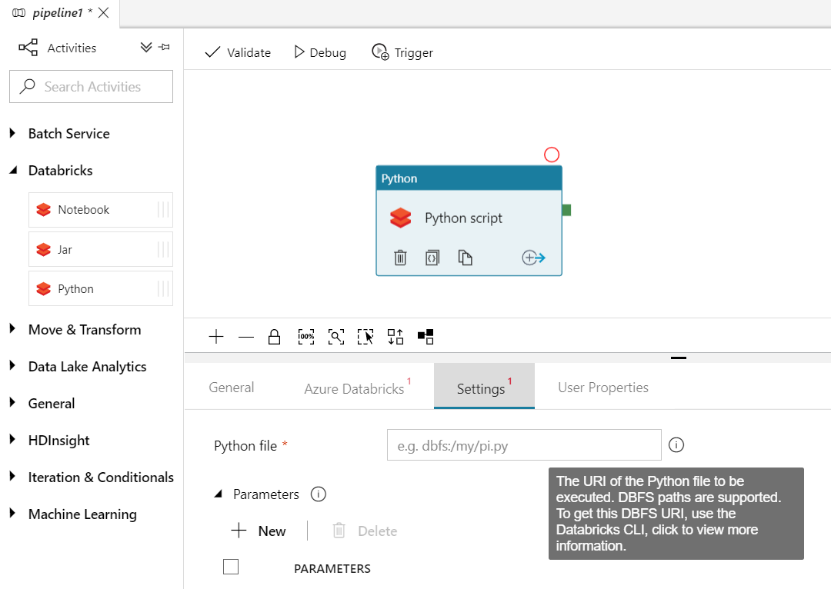
In the “Settings” options, we have to give the path to the notebook or the python script, in our case it’s the path to the “train model” notebook. Both Notebook and Python script has to be stored on Azure Databricks File System, because the DBFS (Distributed File System) paths are the only ones supported.
 |
|||
 |
|||
click to enlarge click to enlarge
In case we need some specific python libraries that are currently not available on the cluster, in the “Append Libraries” option we can simply add the package by selecting the library type pypi and giving the name and version in the library configuration field.
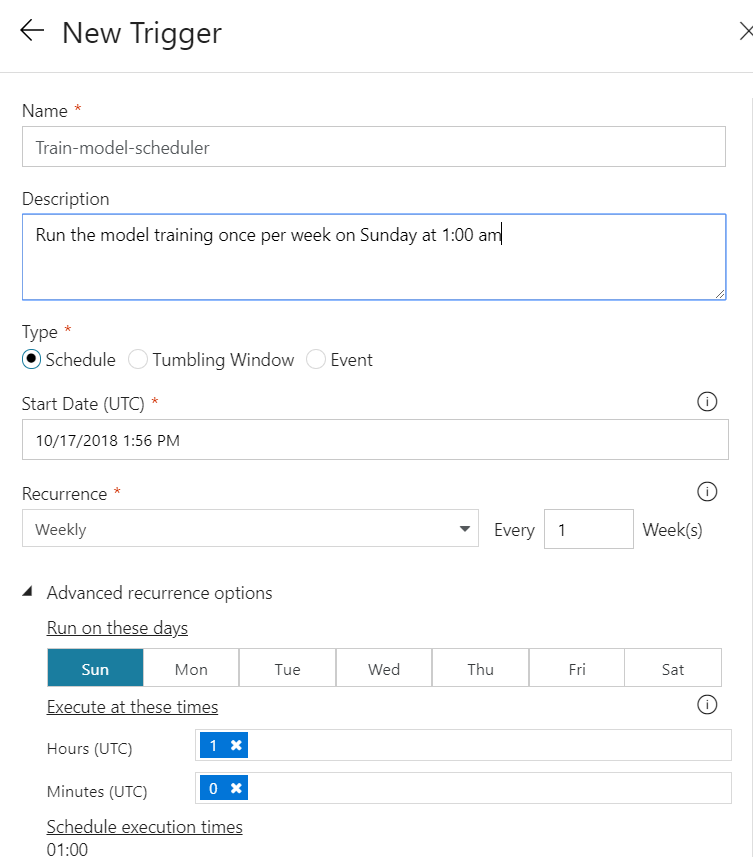
Great, now we can schedule the training of the ML model. In the option “Trigger” in the Data Factory workspace, click New and set up the options where you want your notebook to be executed. In our case, it is scheduled to run every Sunday at 1am.
Data Factory has a great monitoring feature, where you can monitor every run of your pipelines and see the output logs of the activity run. This feature allows us to monitor the pipelines and if all the activities were run successfully. By looking at the output of the activity run, Azure Databricks provides us a link with more detailed output log of the execution.

Pros about Azure Databricks:
- supports different data source types;
- user can choose from different programming languages (Python, R, Scala, Spark, SQL) with libraries such as Tensorflow, Pytorch…
- scalability (manual or autoscale of clusters);
- termination of cluster after being inactive for X minutes (saves money);
- no need for manual cluster configuration (everything is managed by Microsoft);
- data scientists can collaborate on projects;
- GPU machines available for deep learning;
Cons about Azure Databricks:
- No version control with Azure DevOps (VSTS), only Github and Bitbucker supported;
- No integration with Docker containers;
Want to learn more about Spark, Azure Databricks and Delta?
Continue reading in our other Databricks and Spark articles


