Why sync data on-premise to Cloud?
Let’s assume you have an on-premise Oracle or SQL Server database but that you want to get started with analytics. The Cloud is perfect to get started with Business Intelligence or AI use-cases. Teams can leverage Cloud tools such as Power BI, PowerApps, or Microsoft Flow to simplify the day-to-day operations of Sales (order entry), Logistics (quality control), Controlling (deep-dive reporting), Marketing (real-time insights in CRM): the use-cases of your data are endless!

How to sync data? Do I need a full copy (every day)?
- One option is indeed to make a one-time copy. Every day, you would replace the entire dataset in the cloud.
But this might not cover your need: the on-premise database is likely part of an operational set-up (e.g. CRM, ERP). The latest data is typically (very) relevant for our analyses and thus we’ll need a set-up which really continuously syncs data between the on-premise and Cloud set-up.
- Another option would be to upload the file incrementally. This means that you push only the new information and append it to the dataset in the cloud (preferred).
There are two options of incrementally syncing data on-premise to Cloud
- One way is to save the status of your sync in a meta-data file. In this file you would save the row index of the table and thus the ID of the last row you copied. Every time you want to add the newest data to the cloud, you look up the progress (latest row) and start from there (e.g. row IDs bigger than X). This process is out of scope in this article but is extensively explained in the Microsoft Azure Data Factory documentation. (Use a meta-data file when your table doesn’t have an ‘updated timestamp’.)
- Another way to do it is by using tumbling windows. Tumbling windows are time windows that do not overlap and are completely inclusive. As the image below shows, this means that every window will start at the end of the previous window.
In order to use tumbling windows, you need a column in your dataset that keeps the insertion timestamp of that row. The tumbling window will take all the rows that have an insertion timestamp in between the borders of the specific window, and load only these rows. This way a row will never be loaded twice.
A big advantage of tumbling windows is that you can rerun a specific window when something went wrong. Only the data that falls in between the borders of that window will be reloaded.
Why should I use Azure Data Factory?

If you are using Microsoft Azure Cloud, using ADF is the way to go. It's main benefits are twofold:
- ADF takes care of all needed drivers to integrate with Oracle, MySQL or SQL Server; together accounting for +90% of all on-premise databases.
- ADF has a solid way to access data, securely over your firewall through a gateway. Read more about the Integration runtime in Azure Data Factory.
In this article, you will learn how to set up a scheduled incremental load job in Azure Data Factory from your (on-premise) SQL database to a Azure Data Lake (blob storage) using a tumbling window trigger and the Azure Data Factory User Interface. If this is the first time you read about data factory and you have no clue what it does, you can read the introduction on ADF in the Microsoft documentation.
Let's do it!
This is how you set up a sync from on-premise SQL to an Azure Blob Storage
In order to be able to follow this tutorial, you should have the basics already configured:
- An Azure account with an Azure Data Factory instance.
- An Integration runtime configured creating a secure gateway between your on-premise (VPN) network and your Cloud environment. You can find more info on configuring Integration runtime in Azure Data Factory.
- A source database and (set of) tables you want to copy to Cloud: e.g. a local SQL Server 2012 database.
In Data Factory there are three type of activities that are supported: data movement, data transformation and control activities. We will need data movement activities; more specifically ‘Copy Data’ given we want to copy data without any transformation.
1. Set up your datasets
Datasets in Azure Data Factory are references to your source and destination dataset. You’ll need to create both:
- Create your source dataset by adding a new dataset, selecting the technology you are running on-premise (e.g., Oracle or SQL Server) and filling in all required parameters.
Note that you’ll need to select your integration runtime such that Azure gets access behind your corporate firewall and VPN. To read more on integration runtime: read Integration runtime in Azure Data Factory. - Create your destination dataset by similarly adding a new dataset but now selecting Azure technology as destination: i.e. either Blob Storage or Azure Data Lake Store (when building a datalake) or an Azure SQL Database (when building a data warehouse).
If you need to copy multiple tables and datasets from on-premise to Cloud, we recommend you use dynamic datasets and not 1 dataset per table. Dynamic means that we pass parameters (e.g. tableName) at run-time from the pipeline to the dataset and thus re-use 1 dataset for multiple tables. Read more about this here: Using Data Factory Parameterised Linked Services.
2. Set up your pipeline
A pipeline covers the concept of ‘a job’ which for us will be to copy data from on-premise to Cloud for 1 specific table.
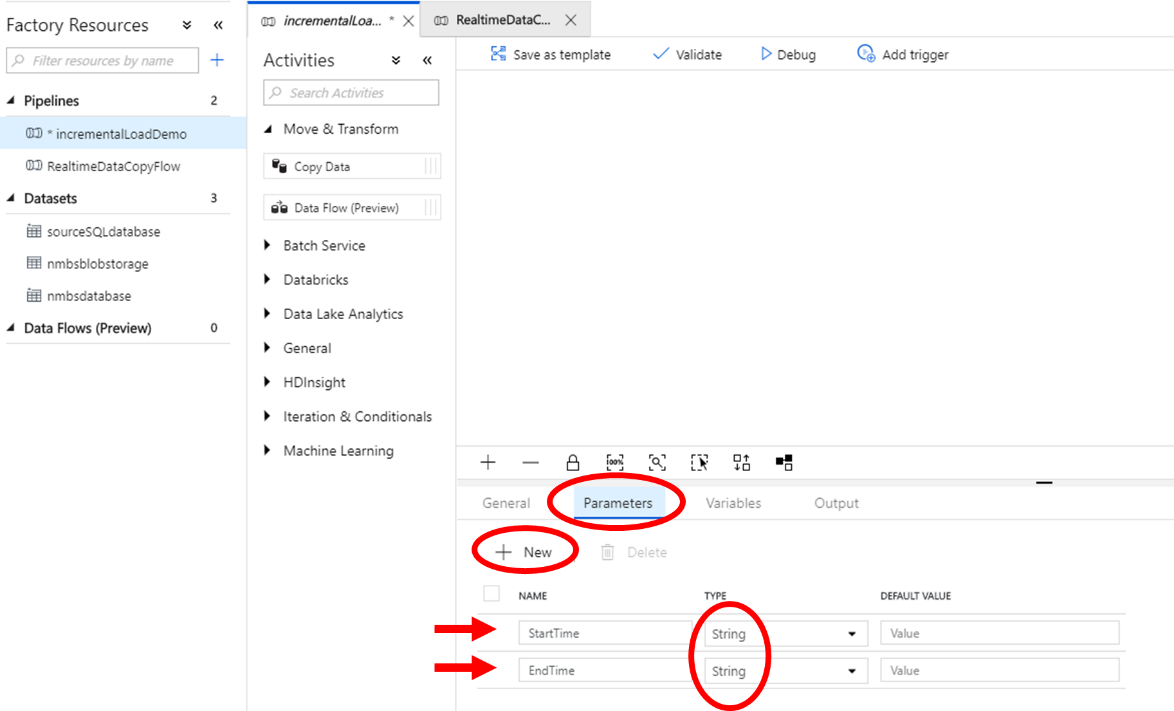
Create a new pipeline and define two pipeline parameters in the parameter tab: StartTime and EndTime. These should be string parameters as the time that is being used to query the source is expected to be a datetime and we will cast the string to the datetime type in the query.
3. Set up your task
Next, create a new ‘Copy Data’ activity that will handle the copying of your source to your destination. In the source tab, select your source table (this is the SQL database you will copy from).
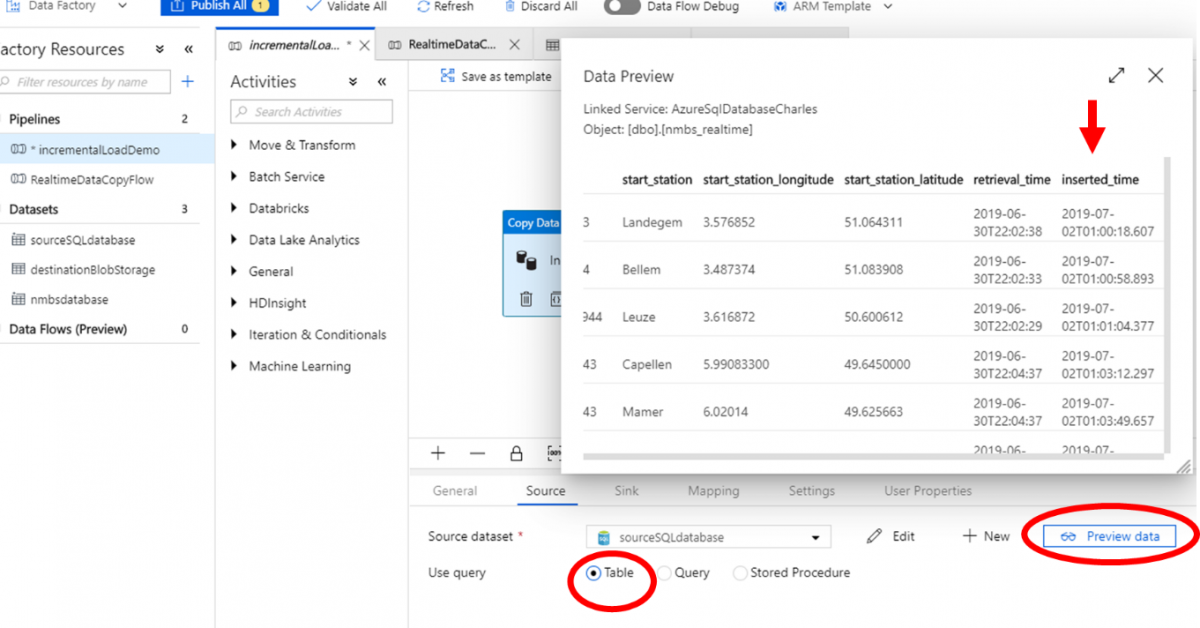
In order to check whether the connection works, select Table as user query and click preview table. Also check if the table actually contains an insertion time column.
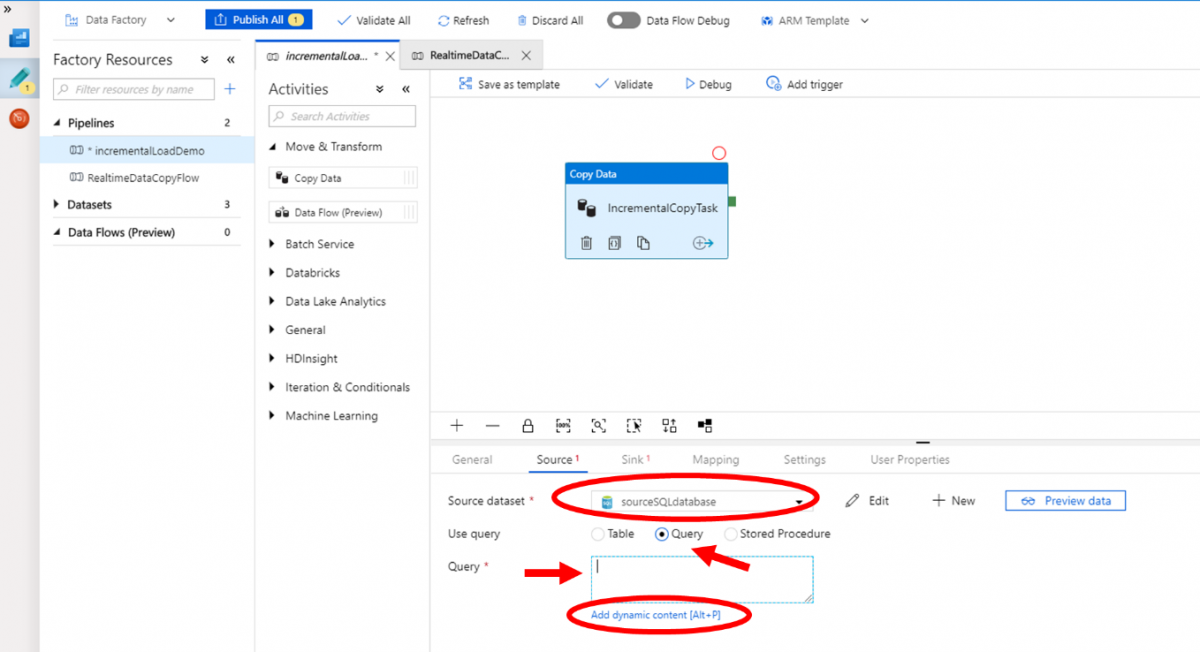
We do not want to copy the entire table in this task, we want to copy only the most recent files, based on the tumbling window. Therefore, we need to specify what rows we want to copy in the query on the source table. Select the Query option in Use Query, and click in the Query box. There will appear a line below the box that says Add dynamic content [Alt+P]. Click on it and an extra window will appear in which we will be able to build our dynamic query.
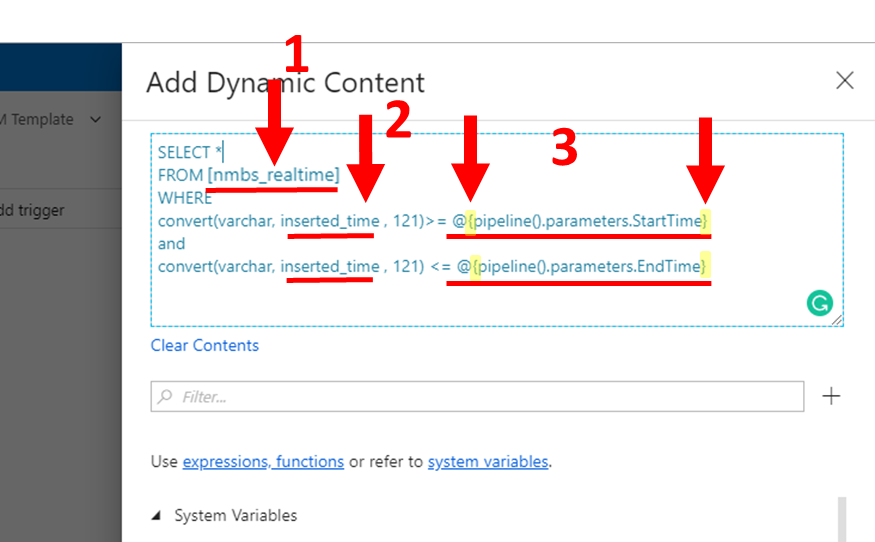
In the FROM statement, make sure you read the correct table in your database (1). This is the name of the actual table in your database, and not the name you gave to your data when you configured the connection.
The WHERE statement is the crucial part in this whole process.
- First of all, we need the column that holds the insertion time in our source table (2). In our case it is called inserted_time as you can see in the previous image. Furthermore we need to convert the inserted_time to a date stamp in order to be able to compare it with our tumbling window borders. (We convert it to a 121 format., more info on this type of conversion can be found here…).
- Now we can compare it to the borders of the tumbling window. These borders are dynamic and are the pipeline parameters we defined above. If you select these parameters by clicking on them in the list of available parameters, make sure you add the curly brackets manually. Without the curly brackets your pipeline will not work.
WHERE
convert(varchar, inserted_time, 121)>=@{pipeline().parameters.StartTime}
and
convert(varchar, inserted_time, 121)>=@{pipeline().parameters.EndTime}
Once you finished writing the query, click continue on the bottom of the window and your dynamic query will be in the source tab.
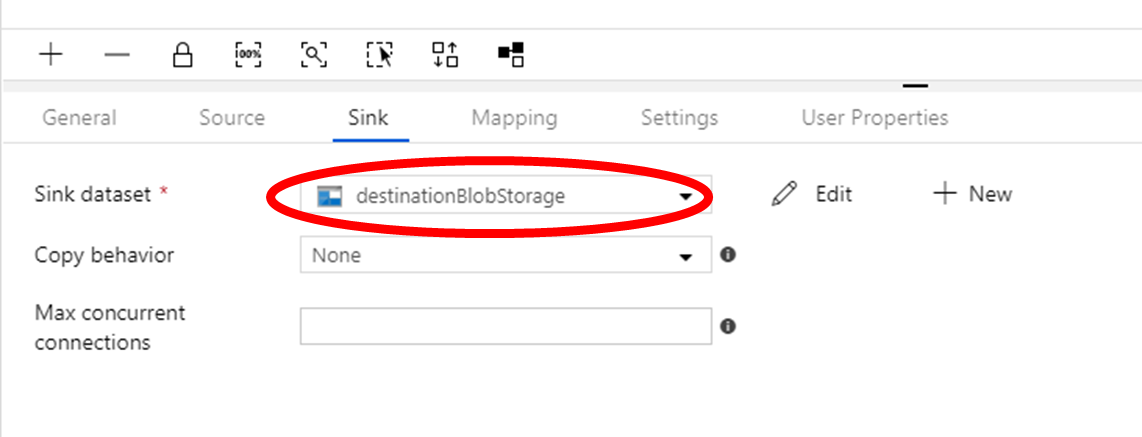
Go on to the sink tab and select the destination dataset. In our case this is the blob storage.
4. Set up the Tumbling Window trigger
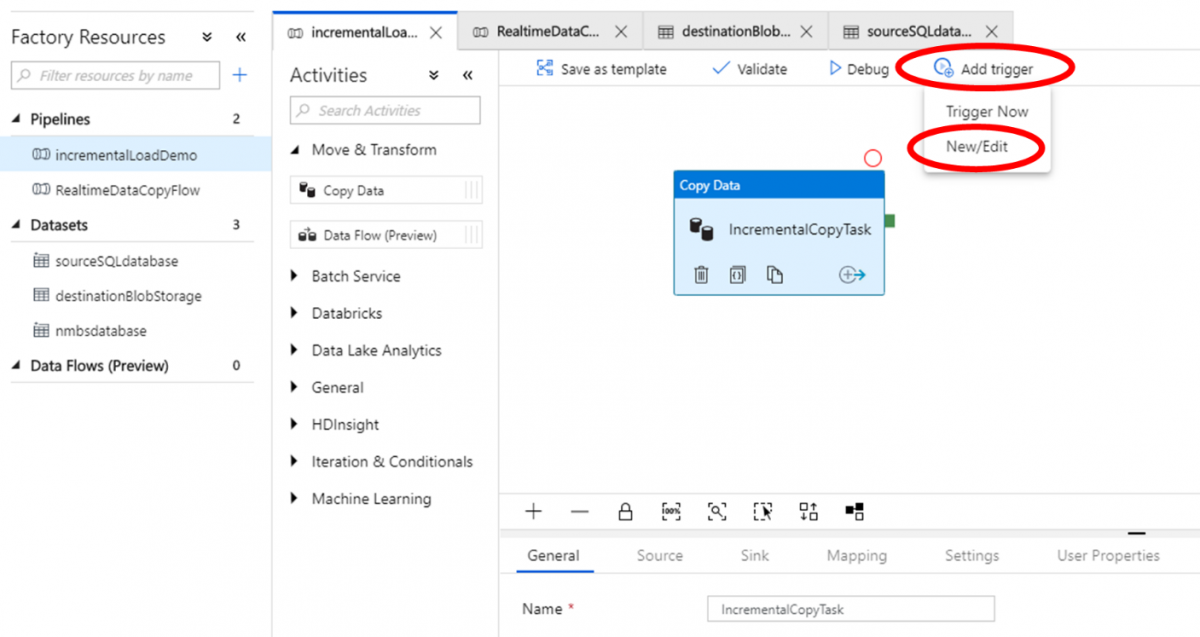
Now it is time for the all important tumbling window trigger. Select add trigger and add a new trigger.
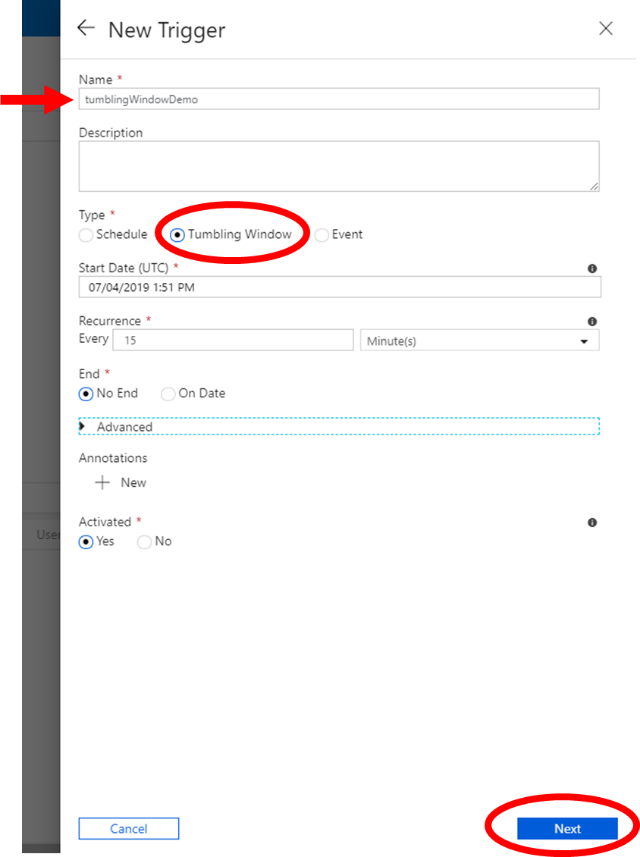
Add a name and select Tumbling window as the type. Select the Start time. This is the time on which the copy has to start. So the first window will be from the start time until the time the trigger is activated. From then on, it will be every time the same window.
The length of that window is specified in the Recurrence field. Choose the interval of your window here. (every 15 minutes in our case). If you would like a fixed end date, specify it in the End field. Once the tumbling window reaches this end, it will stop triggering. Make sure your trigger is activated, then click Next to conclude this pane.
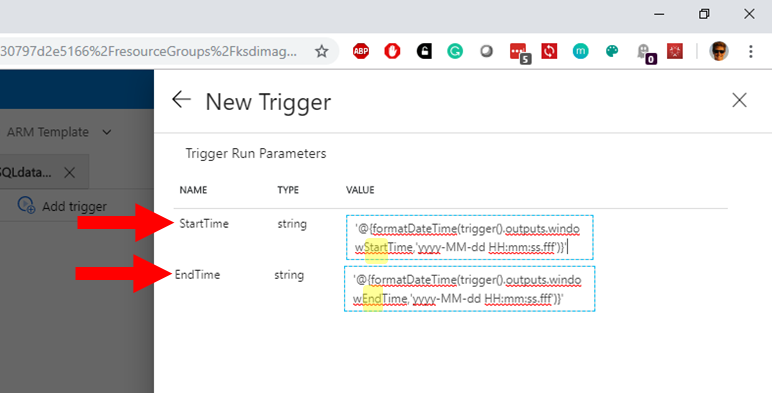
In the following pane the pipeline parameters that we defined above, get assigned a value. These values are the borders of the tumbling window. Notice that these parameters were strings and we format them to a DateTime in order to be comparable with the inserted_time. Click on Finish to go on.
- ‘@{formatDateTime(trigger().outputs.windowStartTime, ‘yyyy-MM-dd HH:mm:ss.fff')}’
- ‘@{formatDateTime(trigger().outputs.windowEndTime, ‘yyyy-MM-dd HH:mm:ss.fff')}’
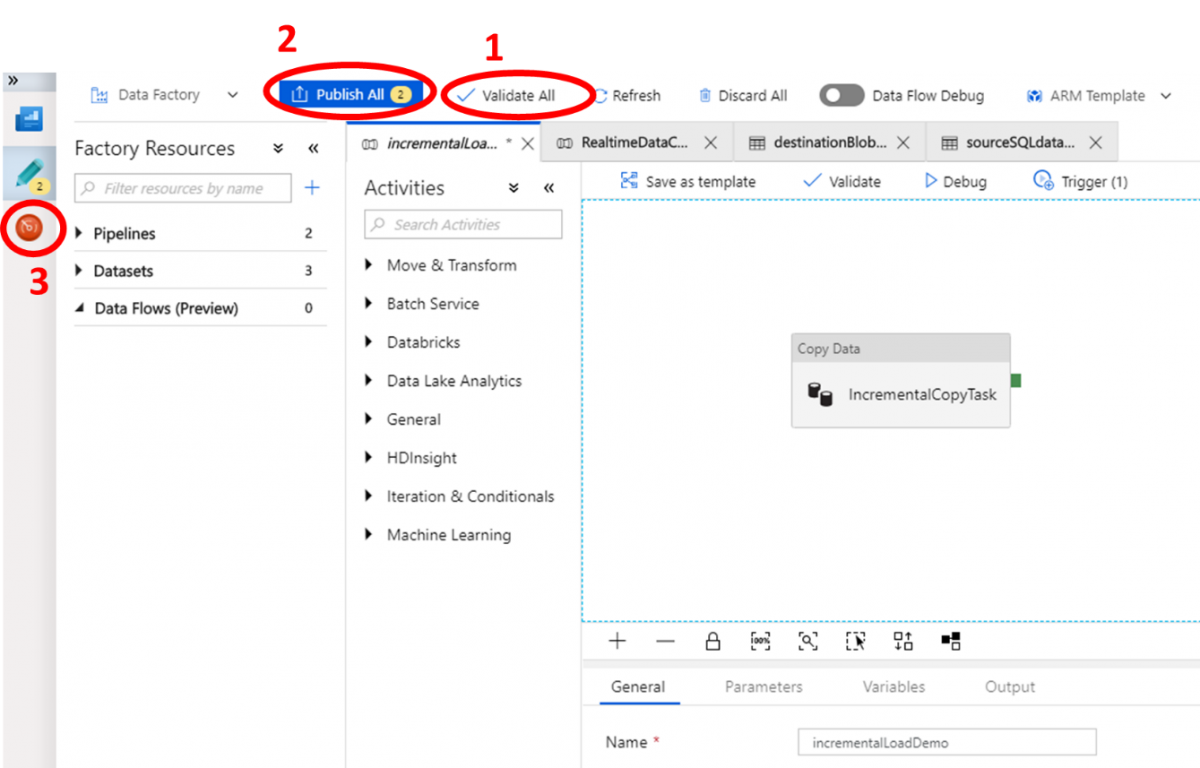
Everything should now be configured: click on Validate All (1) to check whether everything is ok before publishing. Once the validation has been successful, Publish All (2) and go to the monitor tab on the left (3).
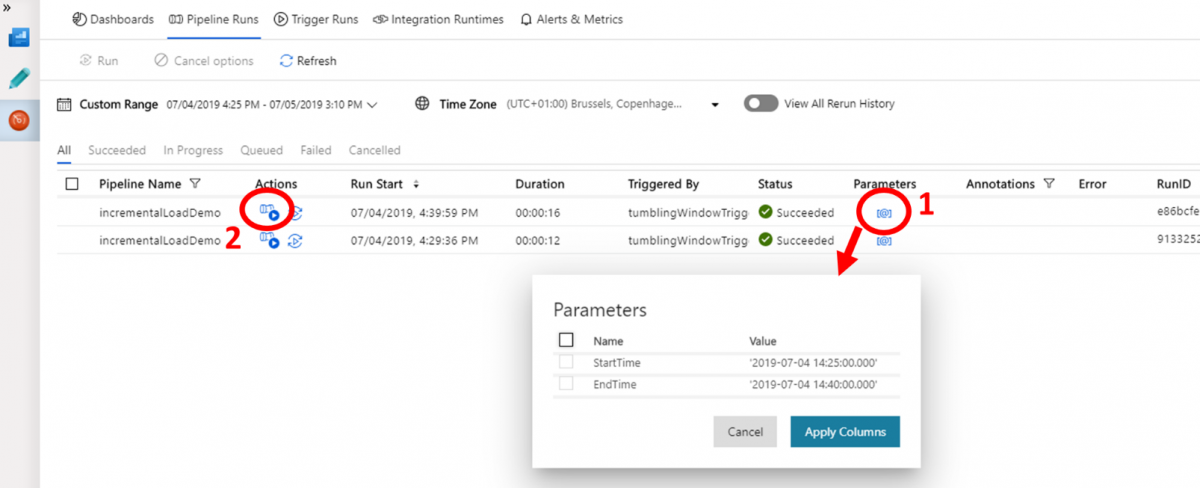
In the monitor tab you can follow the progress of the pipeline. When everything went well, your pipeline runs will appear here as successful. If not, it will say failed.
You can check what values the pipeline parameters got in every run by clicking on the symbol in the Parameters column (1). If you want to have more information on the run, click the View Activity Runs symbol in the Actions column (2). If you would like to rerun a specific run, you can click the right symbol in the Actions column.
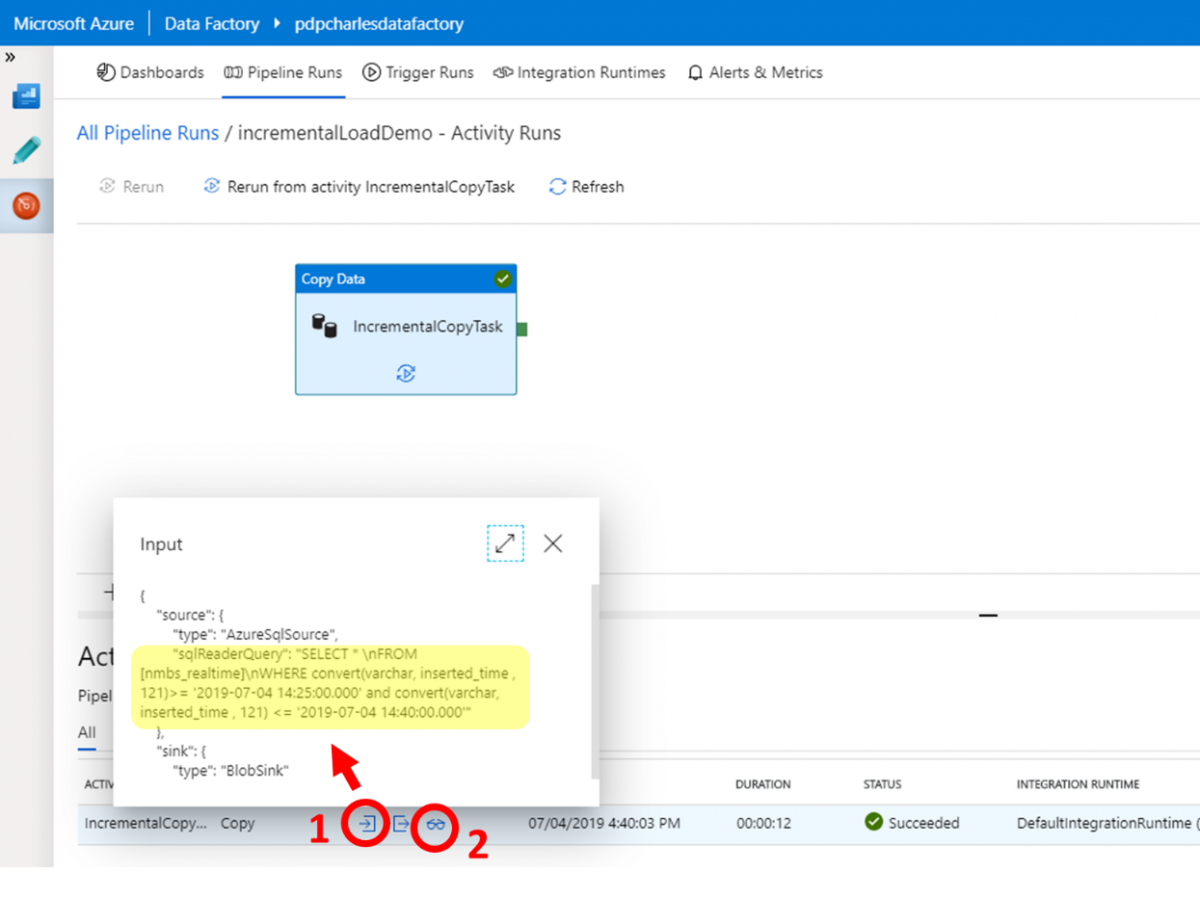
In the monitor window of a specific pipeline run you can find more information on the run. One of the most useful features here is that you can check what the actual query was that you used to get your information from the source table (1). This can help you a lot when something is not working.
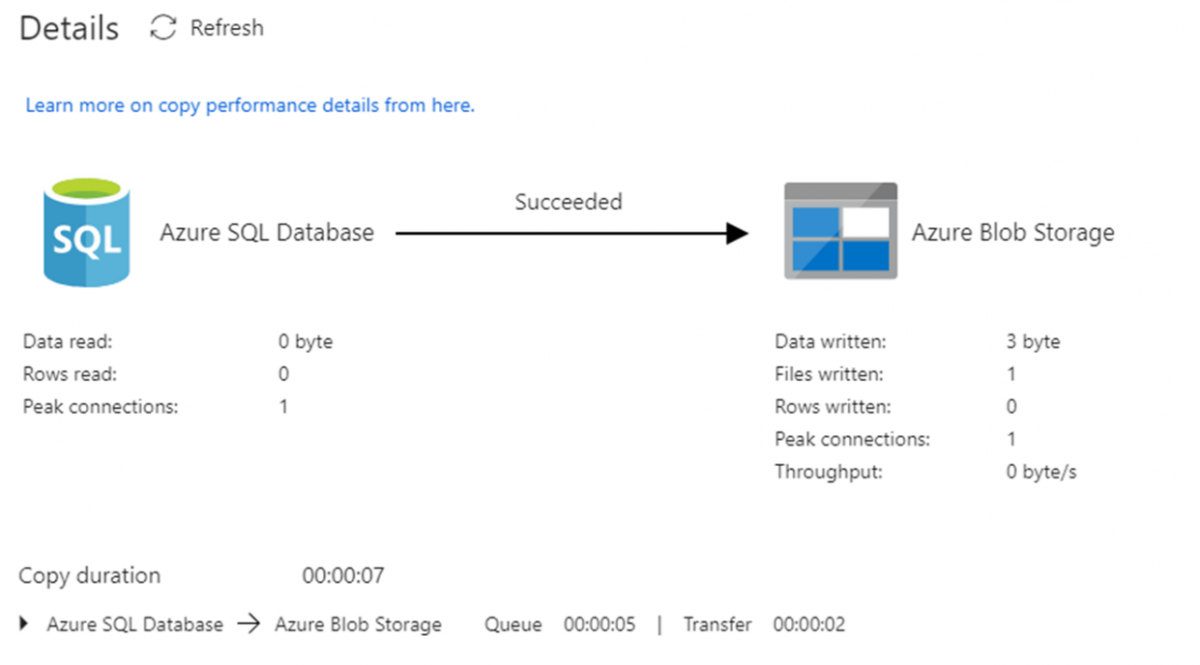
Furthermore, you can check some more statistics on the pipeline run by clicking on the glasses symbol (2). A pop-up window will appear that shows the statistics. Even the throughput speed can be monitored during the run.
Well done! Your first step towards a Modern Data Platform
You’ve successfully set up a hybrid analytics platform where you can now continuously (e.g. every 15mins) sync data between on-premise and Cloud incrementally. Using this set-up you have enabled a series of opportunities:
- To run AI analytics in the cloud in close-to-real-time: e.g. re-scoring a churn model every 15mins to check who is likely to churn based on latest data
- To offer close-to-real-time reporting: i.e., using Power BI on top of your data warehouse or data lake you can now visualize and dashboard on this data.
To build above opportunities, you’ll need to extend your Azure platform with more components. Take a look at our Modern Data Platform or AI use-cases to continue reading on how to use Azure Cloud for enabling data & analytics opportunities.
Contact us for any questions or how to get started.

